|
Condensation Volunteers as an Interesting Winter Subject
When looking for interesting winter subjects, condensation often volunteers. Condensation likes a cold temperature carrier and a warm, moist environment. In the winter, it is of course cold outside and warm (and much more comfortable) inside. The perfect scenario.
With the state of the weather being a deep freeze (about -4°F/-20°C), a unique small oval area of condensation formed in the center of the window above our kitchen sink. With the tripod in and behind the sink and me precariously balanced on the edge of the counter around it, I went to work. The result was an interesting image (OK, many of them) of very unique condensation patterns.
Snow, bare trees and a cloudy sky make up the background seen inverted through the clear condensation drops – a very monochromatic scene. While I could have setup a colored background outside behind the window, doing so (and lighting it) would have presented a big challenge. But, this particular scene lends itself nicely to a creative white balance adjustment as you see here.
150mm f/11.0 1/5s ISO 100
|

|
Patterns Under the Ice
Yes, it is winter and your comfort "mode" is likely staying in your warm house. While I do encourage you to get out of that "mode", I'm referring to a different "mode". Your camera's Auto mode to be more specific.
Today's DSLR cameras have a wide range of fully or semi-automatic modes available, but I still shoot in manual exposure mode at least 95% of the time (as do a significant percentage of other professional and enthusiast photographers). There are many reasons for choosing manual mode, but having full control over image brightness in a snowy environment is the base reason directly related to winter photography. The camera's exposure meter is confused by the bright color of snow and attempts to make it mid-gray in brightness. Yes, you can use exposure compensation to adjust the brightness of the various auto exposure modes, but if the lighting is not changing frequently, I highly recommend using the manual exposure mode alternative. And, winter is a perfect time to perfect your manual exposure skills.
Have no fear: Using Manual Exposure Mode is Not Difficult.
In manual mode, there are three settings that work together to affect the brightness of an image. These three settings are fundamental to photography and learning them is going to be worth your effort. These are shutter speed (the exposure duration), aperture (how wide the lens opens) and ISO (the amplification of the image received by the imaging sensor).
Working backwards, I can't think of a time when I wanted a higher ISO setting for image quality purposes. I want ISO 100 if the other two parameters allow it and adjust upwards as required with noise as the penalty.
My aperture setting is usually selected to control the amount of depth of field in the image. The higher the number, the narrower the lens aperture opens and the greater near-to-far distance that remains in focus. So, if everything in the image needs to be in focus, select a high aperture setting number. There is a caveat with going to a very high number and that is diffraction causing the image to become soft. My compromise is usually to shoot at f/8 on an 18-20 MP APS-C body and f/11 on a 20-22 MP full frame body (I go higher/narrower at times). If I want a maximum background blur, I select a wide open aperture (the smallest number available – such as f/1.4).
The shutter speed is selected to control (show or avoid) motion blur in an image. If avoiding all motion blur, I can't think of a penalty for using a too-high shutter speed (unless flash is being used and that is a topic for another day). If handholding the camera, there will be a point where a too-high percentage of your images become blurred due to camera shake and usually those images will be sent straight to the recycle bin. Motion blur is sometimes desired in an image (such as moving water) and the right exposure duration is needed to capture this effect.
In a perfect world, you would simply select the three perfect parameters for your photo. In reality, there are compromises that are often required and the primary example is a lack of light. If there is not enough light, the shutter speed must be reduced, the aperture must be opened and/or the ISO increased with potential penalties for any of the three adjustments.
Dialing In Settings for Manual Mode
The more experience you gain, the easier it is to set your manual settings. However, it is not hard for even a beginner to get started and with digital technology where it is today, the learning curve is very short. In the old days (when film was popular), this is the time when the light meter would be pulled out. That piece of equipment is no longer needed for most situations and the meter built into the camera is all you need.
There are multiple ways to get the proper manual settings established. You can turn the camera to fully automatic mode and use the settings it picks for you as your initial manual mode settings. You can use the Sunny 16 rule: For a subject under a full sun, set the aperture to f/16 and shutter speed to the 1/ISO setting. Or you can take a guess (what the most-experienced can do).
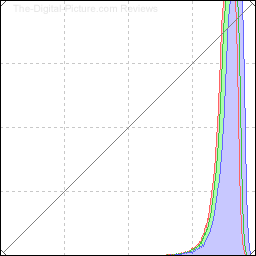
After establishing the initial settings, the next step is to take a picture of a typical scene you can expect to be photographing in (ideally with bright whites included). Then check the camera's histogram for adjustments needed. The histogram shows a graph of the relative brightness of the pixels in your image. This chart is your best friend – learn how to use it. Here is the Canon DPP histogram from the title image.

Press "Info" while reviewing an image to turn the histogram on in Canon cameras and I recommend using the RGB histogram to allow all three color channels (Red, Green Blue) to be monitored. Dark details are mapped on the left side (RGB=0) and bright are on the right (RGB=255). Usually to be avoided are pixels stacked on either side of the graph, indicating a loss of details due to blown highlights or blocked shadows. If possible, adjust your manual mode settings to bring the details within the limits of the chart, but use discretion. Pay attention to the brightness of the details in your scene and reflect their relative brightness on the chart. You don't often want to make black or white colors into mid gray.
I highly recommend shooting in RAW and adjusting the final image brightness to perfection during post processing. Shooting in RAW, I generally like to expose to the right, commonly referred to as ETTR. This means that the brightest pixels in the image are at or very close to 255, the right-most extent of the chart. This method allows the maximum amount of color information (the most photons) to be captured for each pixel with dark areas especially benefitting from this strategy. Image brightness can later be reduced as desired in Lightroom, DPP, etc. ETTR does not work well in all situations and shutter speed is often what is compromised to get a brighter image, so as always, use this technique with discretion.

Especially Useful in Snow
As mentioned, if shooting in the auto zones, cameras will usually underexpose snow images (unless adequate exposure compensation is called for). A manual exposure allows you to dial in the ideal settings and, unless the lighting is changing (such as dark clouds moving over), every image will be identically exposed, making batch adjustment (if necessary) a fast post processing task.
When shooting in bright snow, you are going to want the histogram to show pixels with very close to 255 brightness values (regardless of your ETTR strategy) and you might even want to allow some very small areas to go completely white (enable Highlight Alert and watch for the blinkies during image review). The brightest pixel in the tile image has a max RGB component value of 253. I know, this image is of ice, but there is enough air in the ice to appear nearly as white as snow and similarly confound an auto metering system.
While exploring a small stream deep in the winter, I came across this smooth ice with interesting patterns under it. Capturing this photo and many others like it was very easy. The day was very cloudy, giving me even light without shadows. I setup the tripod with the camera directed straight down, focused on the surface of the ice, determined the manual exposure needed to make the ice as bright as possible without blowing the highlights and took the picture. I then slid the tripod on the ice to the next composition and took that picture. Repeat.
With a manual exposure locked in, the biggest photographical challenge presented by this opportunity was finding a composition that I liked. The patterns were completely random and, in the end, I captured a number of images to sort through. This one is my favorite. I think.
Your turn. Get the camera out and turn the dial to the "M" mode. Learn to make your own fundamental camera setting decisions and your photography will be improved in all seasons.
150mm f/11.0 1/8s ISO 100
|


