Lighting the Princess – Going Simple High Key for the Prom
With 9 students planning to arrive for prom pictures within a short period of time, I had to be ready. The entire week preceding the big day was extra cloudy with lots of rain. The forecast for the Saturday afternoon shoot was calling for clouds with a 30% chance of light rain. Clouds would be perfect for afternoon outdoor lighting, the grass was very green and the new spring leaves on the trees were a great color for a background, but that chance of rain required a studio setup be on standby.
White matches everything, so ... I went with white this year.
Setting up for a high key white background is not hard nor is it expensive. If shooting partial body portraits, a white wall, white reflector or white foam core can work well as the background. For full body portraits, rolled paper is often the best option and it works great. Savage Widetone Seamless Paper Background is what I use.
To hold the rolled paper in place, a background stand (I have Impact and Manfrotto brands) is needed. The rolled paper slides onto the top bar of the background stand and rolls out onto the floor to the front (get another person to hold the background stand up while unrolling the paper as the stand could easily tip over during this step). I gaffer tape the paper to the floor to keep it from rolling back up and clamp the roll of paper to the top bar to keep it from further unrolling.

More complicated than the background setup is the lighting and the balancing of the lights. I typically start my light balancing setup with the camera exposure settings. With powerful strobes in use, I have a lot of flexibility even at the lowest noise ISO setting of 100. With the EOS 1D X Mark II and similar-resolution full frame cameras, I generally start with f/11. This aperture gives me a lot of depth of field, keeping much or all of the subject in focus along with room for error (it is rare to get an out of focus portrait at f/11) without compromising image sharpness to diffraction. Note that, when using a solid-colored background such as rolled paper, there is little benefit to blurring the background via a wide aperture. A 1/160 shutter speed is about as fast as I trust the PocketWizards to trigger the first strobe and for the rest to optically trigger while the shutter is fully open, so that is what I go with. The f/11, 1/160 and ISO 100 combination is generally enough to overwhelm any ambient light present.
For lighting with consistent requirements, manual flash settings are ideal and ... the only option I have with my Elinchrom Digital Style studio monolights (Elinchrom ELC Pro HD Flash Heads are the current models).
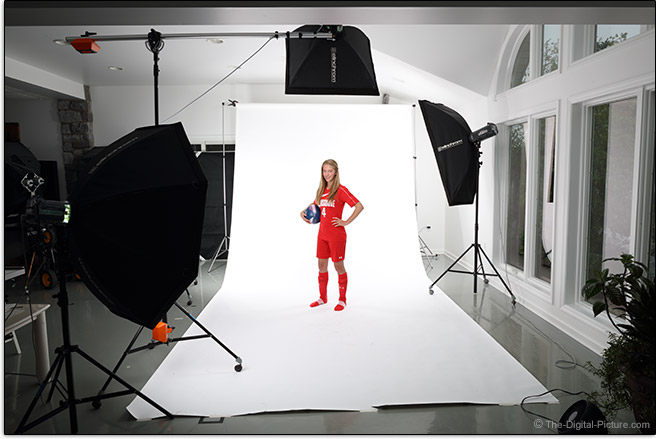
For the high key background, I place a softbox-fitted strobe on each side of the paper with the power set high enough to blow out the background in the selected exposure (but not higher than necessary as flare could become an issue). I was tempted to place a 4x8' piece of clear Plexiglas on the floor under the subject to better reflect the bright background, but ... I feared that the parade of subjects flowing through my studio would not be kind to this relatively-expensive piece of plastic's useful lifespan.
To keep the background reflection from strongly influencing the lighting on the subject (a wrapping light the softens the transition from subject to the background), the subject should be positioned well in front of the background. The subject to background distance was about 10' (3m) in this example.
Prom is all about the dress (or tux) and a 54" octagonal softbox angled just slightly downward and directly at the subject from camera-left created an even light emphasizing the dresses. This light was adjusted to the output needed for proper dress brightness with care taken to not overexpose the dress as reducing brightness during post processing can reduce the background's whiteness. A 24x24" softbox on a Manfrotto boom was positioned above the subject to light their head with the appropriate brightness setting used for that.
While it takes multiple lights to effectively create a high key effect and light the subject, the light sources do not have to be studio strobes. I have done the same many times with Speedlites and constant lights, can also be utilized. And, the background does not have to be pure white as long as your background lights are bright enough to make whatever color is available bright enough. I've even shot high key corporate portraits using a light-colored wallpaper background. Hit it with enough light and it turns white.
Umbrellas can be used in place of softboxes.
By the time my first subject arrived (my own daughter was first and about 1 hour late), the day was bright, sunny and unfavorable for lighting in my preferred outdoor locations. It didn't take much thought to know that the indoor option was best.
With the lighting and camera settings all dialed in before any subjects arrived, I was able to take lots of photos in a short/compressed amount of time.
The Canon EF 70-200mm f/2.8L IS II USM Lens is an excellent portrait lens and 70mm is just wide enough for comfortably shooting full length portraits in my studio space. The just-arrived Canon EOS-1D X Mark II was my camera choice for this shoot. This scenario was a walk in the park for this camera.
A larger version of this image is available on Flickr, Google+, Facebook and 500px. If reading from a news feed reader, click through to see the framed image. Please share these tips with your circle of friends!
Have any questions? Ask!
ISO 100
3648 x 5472px

